
Crop Photos for Printing
In this week’s blog post, we’re going to walk you through how we crop photos for printing, and how you can find the dimensions and ratios of your photos.
The most common question customers ask us is in relation to the size of their image. An average customer, who is not a designer or photographer, may not always know the size of their photo, and they may not always know what size the photo can print at. Fortunately, Big Acrylic goes through a thorough pre-production process to ensure that your image is a high quality.
We’ve already discussed necessary DPI for printing. But now we’re going to show you how we crop photos for printing, and why some dimensions just don’t work. Many customers upload images to the website, and specify dimensions that they want the print to be. However, the images may not always work as intended, which is why we check for size and quality.
An Overview
At Big Acrylic, we crop according to ratio, not to specified dimensions. In doing this, we preserve your image. Cropping to fit dimensions stretches or distorts the original image, which can result in a pixelated, or overall poor looking final product.
The concept of ratios can be a little confusing for customers not familiar with it. Essentially, it means is that your image has a set length and height when you take it. The ratio, then, comes from the relationship between the length and the height of the photo. For example, a 3:2 aspect ratio means that the length is 1.5 longer than the height. In print sizes, these would be a 24×16, a 30×20, or 36×24. Similarly, a 1:1 ratio means the image is a square, and a 4:3 ratio means the length is 1.3 times longer than the height.
When we receive your images, we download them and check to make sure that the image you sent us fits the specified dimensions you gave. Sometimes, though, the images may not work for those dimensions, and we have to crop the image.
How Ratios Work
Because your image already has a ratio, it means that the full-size photo can only work at that ratio. One of the most confusing points about ratios concerns the sizing. This is especially true with panoramic photos. Often, customers think that providing larger dimensions means there will be less cropping because the image will be bigger. But this is not always the case. For example, if you ordered a 48×16 print, but the image is actually a 48×10. While at first glance it looks like the 48×10 image is cropped more, the extra 6 inches added to the height means that the 48 inches of length will span a smaller part of the image.
How We Crop Photos for Printing
Let’s say you really like this photo, and you want to make it into a panoramic print. When you upload the photo and select the size, you select a 48×16.

When Big Acrylic receives your print, we then put in the sizes you specified and see if those dimensions work. So, when we put in 48×16, we see this:
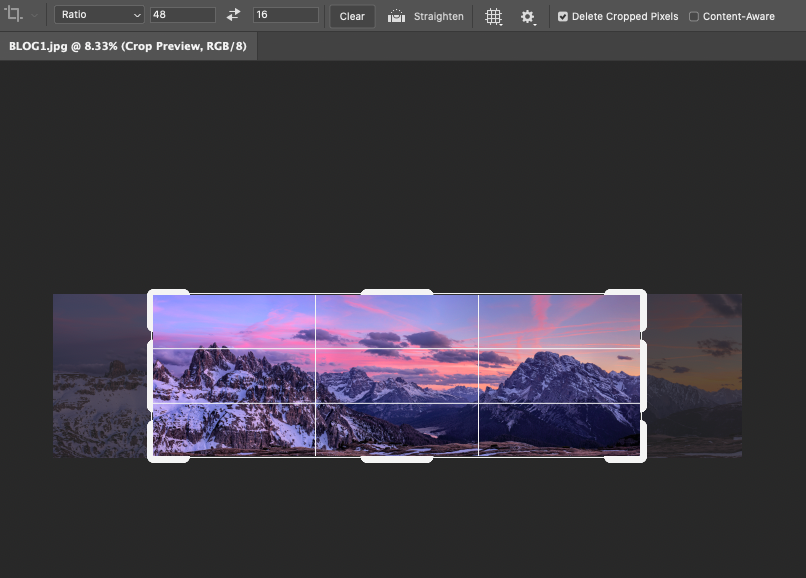
Obviously, a 48×16 size would not work with this image without losing a ton of the beautiful detail. The image is not a 48×16. It is, as we find out, a 48×11.
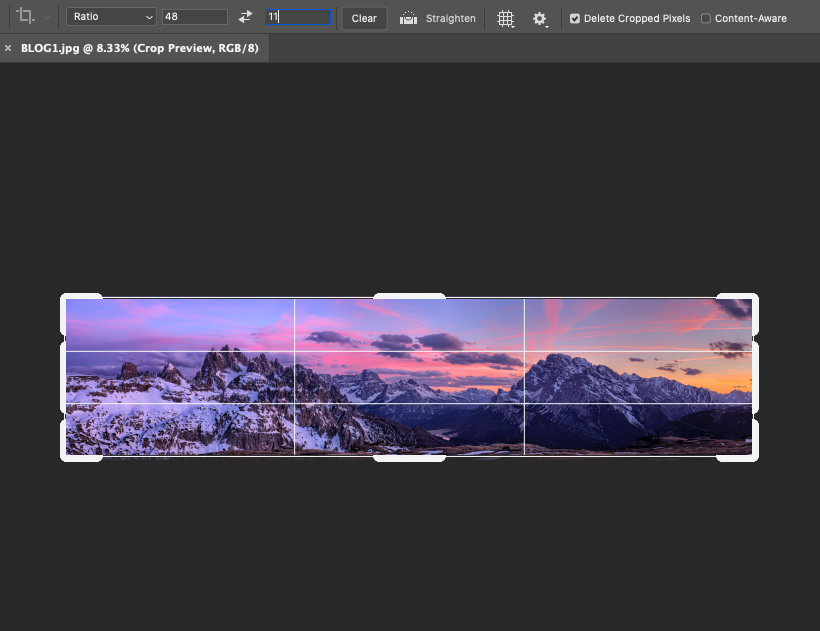
By adding the extra 5 inches of height, the 48 inches along the bottom cannot stretch across the whole picture to maintain the 16:9 panoramic ratio. The ratio cannot capture the whole image as is. Stretching the image to fit the 48×16 ratio results in an image that looks like this:
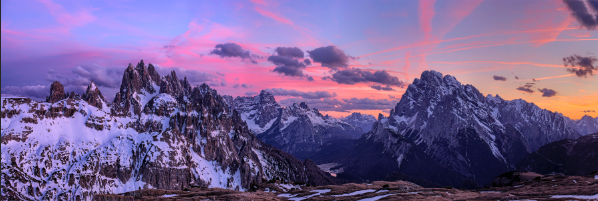
While this photo is still lovely, you can see how it has been distorted to fit the size requirements. Making the mountains taller, and closer together instead of giving that long panoramic view you originally captured. Stretching the image can work in some cases, but only if the image is of very high quality, like a .tiff file, a raw image, or an image over 300 DPI. For images that are less high quality, stretching causes pixilation and heavy distortion. We also don’t recommend stretching non-landscape photos. Stretching a portrait or a photo of a pet can make features look larger or smaller, like a fun-house mirror.
How You Can Determine the Right Size
The easiest and simplest way to find what size will work for your image is to contact us and send us the image in question. We are more than happy to provide a size that works for your image, and we can also advise you as to whether the quality is good enough for a larger size, or if the photo works better as a smaller print.
Another option is to do some math. As we mentioned in our DPI post, you can determine the biggest size you can print by dividing the pixels by the required DPI. Knowing this size will help you crop photos for printing.
Here’s what that looks like:

The dimensions on this image are 8268 pixels by 1960 pixels. Keeping in mind that you need a minimum DPI of 150, you would divide 8268/150 and 1960/150 to get 55×13. This is the largest possible size for this photo. As we’ve already seen, the photo can work as a 48×11. To determine what other sizes work for this image, simply divide 55/13 to get 4.23. You now know that this image will work at any size where the length is 4.23 times longer than the height.
If you have a specific space set aside for a print, take a measure of it and use one of those measurements to be your baseline. If you have 12 inches to work with, simply multiply 12 by 4.23 to get the length possible for this photo. Your print will be 51×12.
Notes on How We Crop Photos for Printing
As a print size of 51×12 is not available on our website to order through the drop-down menu, you should reach out to us to order custom-sized prints.
We provide proofs if we must crop the photo substantially to give you a sense of what the image looks like in those dimensions. We also provide the alternative size for the photo that will cover the same area, or not cost you more to produce. Usually, we do not provide proofs if the image is sized correctly and good to go into production.
And don’t forget, Big Acrylic is dedicated to customer service, so we are on-hand 24/7 to take your questions and concerns. It’s always a good time to reach out!

