
How to Convert Print Photos to Digital Files (and Make Beautiful Wall Art)
You spent a rainy afternoon combing through old photos. All those special memories come flooding back, and you have a smile on your face. It was a much simpler time; back when digital photos and phone cameras didn’t exist. But now, you want to create an acrylic or metal print, and you only have print photos. What do you do? Fortunately, we’re here to help you learn how to convert print photos to digital files that can be used to make a truly special acrylic or metal print.
By following our easy how-to guide, you will quickly have a digital file of your most memorable prints. And let’s not forget, once you have a digital file, editing, altering, or creating a collage become a breeze!
How to Convert Print Photos to Digital Files
Method One: Scanning
Let’s start out with the basics and use a standard photo size: 5 x 7.
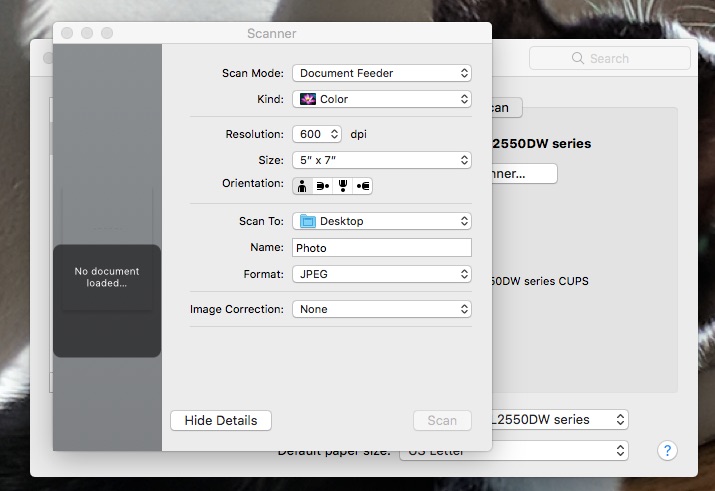
- Take your 5 x 7 photo and lay it flat and in-line on a scanner.
- Before you scan the photo, set the scanner to 600 d.p.i. Make sure all other settings are correct.
- Once the image has been scanned, right click the image icon where ever you saved it.
- At the bottom of the list, click “Properties.” On a Mac, this is “Get Info.”
- At the top of the window, click “Details.” On a Mac, simply scroll down to where you see “Dimensions.”
- This will give you a width and heigh pixel dimension. You can then determine how large you are able to print that particular photo.
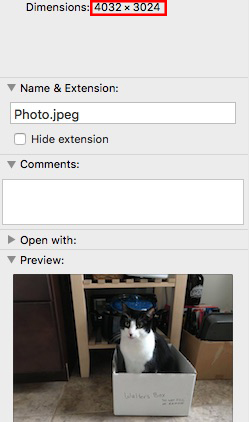
- Divide each dimension by 150. 150 d.p.i is the minimum quality needed to produce large acrylic or metal prints. For more on d.p.i., check out our guide.
- For example, 4032/150 = 27 and 3024/150 = 20.
- The largest print possible for this image is a 27×20.
Method Two: Taking a Photo
This method can be a little tricky, but can also be much more accessible if you do not have access to a scanner. A more manual method, like this one, may feel more comfortable for you if you don’t consider yourself “tech-savvy.” The key to making this method work is to prepare.
- Find a surface that is flat and well-lit. You do not want direct light from behind as this will create visible glare, or a shadow of your phone/camera on the photo.
- It may work to have the photo propped upright instead of laying down, if you cannot find a surface that will not create glare.
- Set your phone camera to the highest quality setting. This may be done in the settings menu of your camera app.
- Take a few test shots to see whether a glare, shadow, or reflection is visible. Also check to see if the photo is bright enough, or in focus. Remember, you can tap your screen to set the focus of the photo.


The best way to ensure this method is successful is to send us more than one image. We will be able to fine-tune any image to ensure that it is bright and straight. Sending us multiple images allows us to choose the best one to ensure the quality of your print.
If you ever need any assistance with how to convert print photos to digital files, don’t hesitate to contact us!
Using Your Digital Files to Make Beautiful Art
Now that you know how to convert print photos to digital files, it’s time for the fun part: deciding which medium will work best for the photo. Luckily, at Big Acrylic, we have a number of styles that will suit your needs.
Acrylic
Our most classic option, and the backbone of our business. An acrylic print is a modern way of showing off your old photos. The acrylic gives the photo an update that goes beyond the traditional paper and frame. A large acrylic print can be the whole focal point of the room. Acrylic has a bit of shine to it, which makes the photo feel renewed and vibrant.
Brushed Metal
Brushed metal has what we call a “textured look.” Any area of the photo that is white will show the brushed pattern of the panel. The texture of the brush can also hide some inadequacies of the photo. This option would look excellent for older print photos with more sepia tones and whose quality may have degraded over time. Additionally, photos with more subdued hues, or in black and white would look excellent as a brushed metal print. Texture takes centre-stage with these prints, so print photos lacking vibrant colors will not look dull or dark.
White Metal
A white metal print gives you vibrant colors without any glare. These prints feature high color contrast, which will look wonderful for any image. Instead of a textured look, any white areas on the photo will be a clean, chic white metal. This pop of white does not wash out the colors, but enhances them.
Sublimated Metal
The sublimated metal print bursts with a plethora of colors. It adds a powerful presence to the room and is sure to be a much-talked about focal point. The image is heat-infused directly onto the panel, which results in rich, long-lasting color.
Thank you for reading along with our guide on how to convert print photos to digital files! We hope we can help turn your favorite memories into beautiful pieces of art that will last a lifetime!

